Behind The Seams

Ramblings of a sewing fanatic

My Photo
Name:
Location: Fashion Hell, Florida, United States

Thursday, June 29, 2006

Happy Birthday, Honey - Final

When I was ironing a couple of Tommy Bahama camp shirts the other day, I noticed that the edgestitching on the facing stopped at the top vs. turning the corner and meeting the collar stitching. I thought I'd give this a try - I'm not sure whether I like it or not. It certainly was easier.

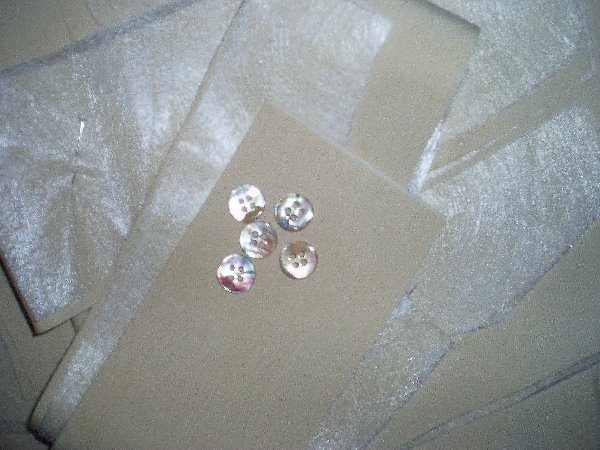
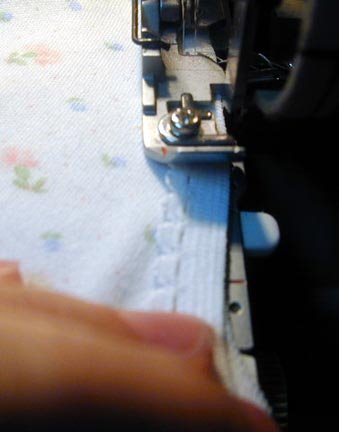
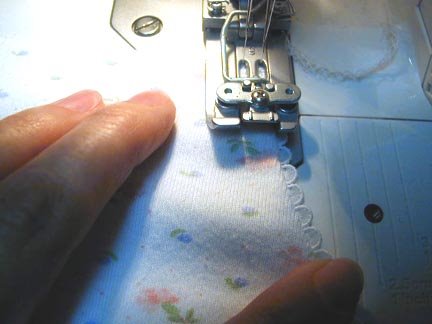
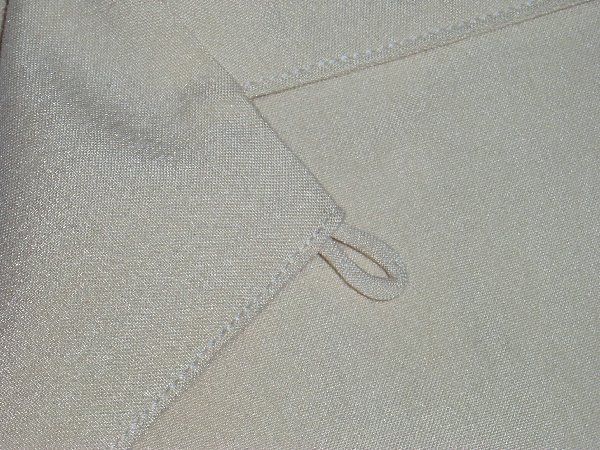
I made an extra thin piece of bias tubing for the button loop. I stitched about 1/8" from the fold of my bias strip and then turned it with a needle and thread after trimming the seam allowances close to the stitching. Just for kicks, I sewed this entire shirt with Mettler Silk-Finish cotton thread. I must say, I really liked it for the topstitching. The thread melds into the fabric so much better than polyester. I'll have to see how it holds up in the construction.


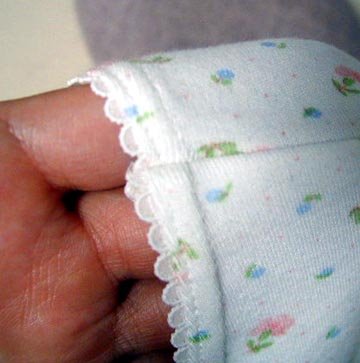
Here's the finished collar area. This is the first time I've added the loop. It's really just decorative since I didn't sew the necessary button under the collar. The pattern (Kwik-Sew 2935) directs you to cut the loop 1.75" long which is just a wee bit too long, in my opinion. I think I'll try 1.5" on the next shirt.


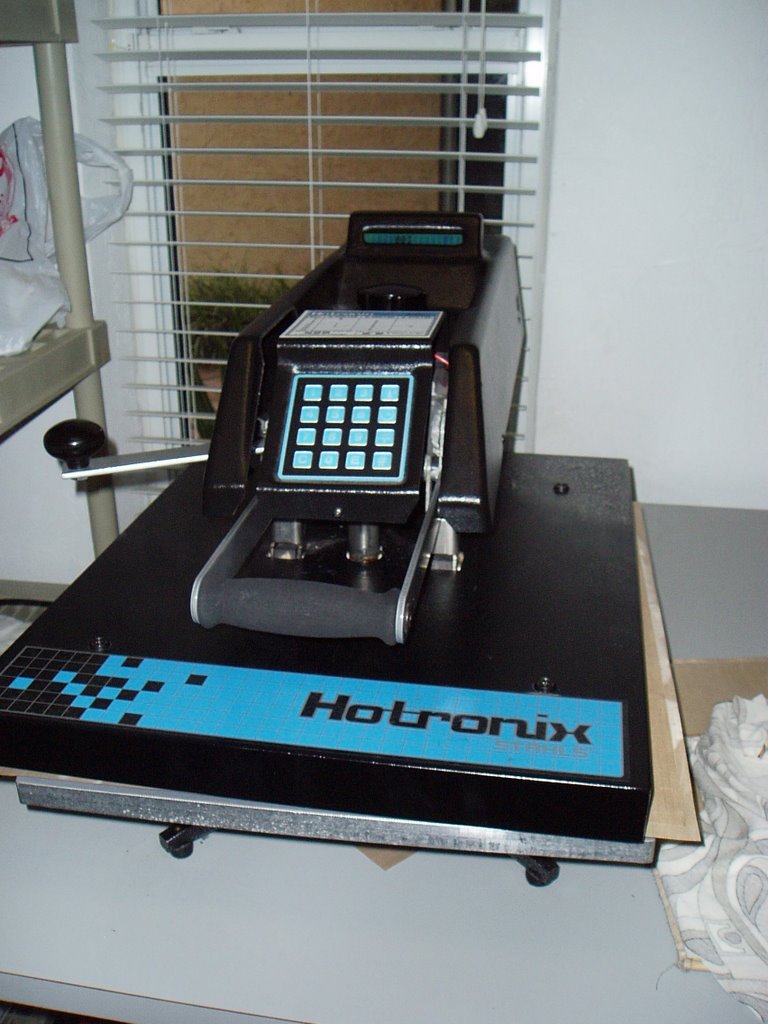
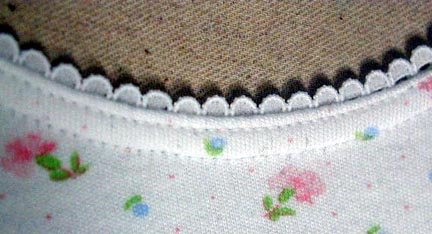
Tone-on-tone embroidery is a big thing with executives these days. Advertising with a whisper. The embroidery looks a little wonky but that's because I had it draped over a pile of fabric on my pressing surface when I took the photograph.


Of course, I made him open it tonight before we went to bed and he loved it! He is wearing it tomorrow to the closing.

Wednesday, June 28, 2006

Happy Birthday, Honey - Part 2

Naturally, I am running way behind schedule on my husband's birthday shirts. Something came up yesterday and I was away all day. By the time I came home at 9:30 last night I was ready for nothing more than a small snack and bed. I know better than to start cutting when I'm tired. That meant that I had work to catch up on today so I wasn't able to start cutting until tonight. I only cut out the cream silk. Because I volunteered to help out at the restaurant on Friday, I only have tomorrow to sew and I must do it quickly and in between my other work! At this point, I'll be happy to have one shirt to give him on his special day. I wish I were more like Carolyn and could crank out beautiful things under pressure! And, yes, if you are wondering, that is soil separator cloth that I used to trace my pattern. Every time I use this pattern I am reminded how much I hate soil separator cloth. I can't stand the way it feels and I can't read the notes I've written on the pattern. I really should retrace it onto something else.


Happily, I found some really pretty mother-of-pearl buttons for the cream silk in my button stash. I always try to use mother-of-pearl buttons on my husband's shirts. They seem to be more and more difficult to find and my stash is dwindling. I looked through my entire button stash and couldn't find anything to go with the raisin-colored rayon, never mind anything in mother-of-pearl. I think I have a pretty good button stash but I could be wrong. Maybe I should stop buying fabric and vintage patterns and concentrate on buttons for awhile.


I guess that means settling for some ordinary plastic button from JoAnn's. Maybe I'll get lucky and find something in wood. Better yet, maybe I'll cut the wood buttons off of that orange Tommy Bahama shirt of my husband's that I hate so much. ;-) Button shopping will have to wait until the weekend. I really don't want to waste an hour going to Fabric Hell. You know how it is - I'd have to sit and look through the pattern books and just generally look around to confirm that they have the same old stinky fabric they always do. My mother always said I was a dawdler and she was right (about that anyway).

Monday, June 26, 2006

Lizards!

I love lizards, they are so cute! I spend some time rescuing them from my cats just about every day. My cats obviously have no regard for how many bugs lizards eat, hmph. Check out this cutie hiding out in my mailbox. He let me take a couple of pictures and then ducked out of sight. He'll probably scare the bejesus out of me when I get the mail this afternoon.


Last Friday, one of my customers pointed this one out to me. He (or she, I don't know how to tell) was just hanging out, sunning himself. No big deal. Except that, by my estimation, he was between 10 and 12 inches long! Imagine the number of enormous bugs this fella needs every day! I can only hope he's lurking around my yard somewhere enjoying all of the bugs that seem to be munching on my pesticide-free plant life. Speaking of which, I've been wanting to buy some ladybugs to keep the aphids under control. Have you noticed that ladybugs are pretty scarce these days? I wonder if lizards eat ladybugs?

Happy Birthday, Honey!

Friday is my husband's birthday. It also happens to be the day he is closing on the restaurant he's buying. He had mentioned to me that he wanted some nice Tommy Bahama-style camp shirts with the restaurant logo on them. Perfect - a nice birthday present for the man who has everything. After he left for work this morning I searched my stash. I pulled out a cream sueded silk and a denim-blue silk linen. Sadly, I didn't have enough of the blue silk for a camp shirt. Darn, I guess I'll have to use that for myself.

Then, I made the ultimate sacrifice. I hopped into my car and drove to Ultra Fabrics in Pembroke Pines. I was disappointed to see that they are still closed (hurricane damage). Not to be deterred, I drove to Elia's Fabrics in Hialeah. Lots of gorgeous suitings and a ton of polyester silkies. I left empty-handed. On the way back I decided to stop at RM Fabrics in North Miami. It was on the way back to the highway and sometimes I get lucky there. I found this beautiful raisin-colored sueded rayon with a paisley jaquard pattern. Only $6/yd so I bought the whole bolt. I don't know why I do that. I will have to age the leftovers for several years so that DH and I don't accidentally end up matching. Old habits die hard.

Saturday, June 24, 2006

Bonus tank top

I love to wear tank tops around the house so I was thrilled to see that I had just enough of the Pucci-inspired fabric left over to squeeze out a Loes Hinse Tank. This tank top is really easy and fits nicely. I like the fact that my bra doesn't show - even under the arm. To finish the edges I used some ruffled lingerie elastic. There isn't much black in this print but, believe it or not, I didn't have any brown or beige elastic in my stash that didn't look like it belonged on a pair of panties. So, I made due with what I had on hand. I added the flat bow because it just looked like it needed *something*.

Pucci print dress!

Many of you know about my cutting mishap with this Pucci-inspired fabric. Even decades of experience do not make one immune to silly mistakes! But, thanks to Sherry Doty, who so generously offered me her piece, the dress is now finished! I used the same vintage pattern, Simplicity 6672, that I used for my graduation dress back in May.


The dress will be making it's debut this evening at my father-in-law's birthday birthday bash.

Wednesday, June 21, 2006

Industrial Sewing Machines

Let's talk about industrials for a moment. There seems to be a misconception among home sewers that "industrial" means heavy duty. Not so. There are industrial machines for all different types of work. An industrial dressmaking head will no more sew heavy materials and be able to handle heavy nylon thread than whatever home machine you are working on. Nor will a machine intended to handle heavy materials work well if you are making a dress.

Let's compare:


This is an industrial zigzag - a Singer 20U-33. She used to be blue but she had a face lift last year. :-) I use her mainly for uniform work in my embroidery business (sewing on trims, tackle twill numbers, etc.). She also handles home dec projects very well (dust ruffles, draperies, pillows, etc.) and doesn't mind lightweight garment leathers. However, she does not like heavy work, nor does she like heavy thread. Believe me, I tried it *very carefully* last year and ended up breaking the hook.


This is an industrial walking foot machine - a Consew 206RB. She LOVES heavy work! She will sew through bulky layers of leather or awning canvas like a hot knife through butter. Heavy thread? No problem! I use her mainly for sewing heavy leathers but she will handle anything and everything from canvas on up. My friend Sandy uses the same machine in her upholstery business and my friend Sharon uses a similar model (the 226) to make tapestry purses and pressing boards.

What really peeves me are unscrupulous Ebay sellers who list plain old domestic machines as "industrial". Just because it looks like an iron horse doesn't make it industrial and if it is industrial doesn't mean it will handle heavy work. Do your homework - I cannot stress this enough! If you don't know someone who is knowledgeable about the model you are considering, a wealth of information can be found right here on the internet.

Here's a good one. This machine is being sold as an "industrial walking foot". Check out the sticker! ;-) It even uses "industrial thread"! You mean, like cone thread? Wow.


And look! The seller has cleverly disguised the "industrial walking foot" as a plain old zigzag foot. Read further and you'll find that the walking foot is "detachable" - a dead giveaway. Honestly, how do people keep a straight face when they are typing up these listings? Even worse, how do they sleep at night?


The seller says he has sold this machine for nearly $1000 new in the box but you, my dear Ebay buyer, can buy it for just over $100. My local dealer sells this budget-friendly home machine for $99.

Tuesday, June 20, 2006

Coverstitching over serged seams

Coverhemming over a bulky serged seam is easy! I've been using this method for years. Don't be afraid to clip close to the seamline - I haven't lost a seam yet. :-)


Before turning up the hem, clip to the seamline at the foldline.


Then, turn the hem seam allowance in the opposite direction of the garment seam allowance before turning up the hem.


This will give you a nice smooth seam to stitch over.


Best of all, you won't have all of those tiny, crooked stitches on either side of the seamline!

Simplicity 4237 Bubble Skirt

The bubble skirt is finished! See all of my pattern alterations The Sewing Divas blog!

Saturday, June 17, 2006

Block fusing

I have been block fusing my interfacing for years - ever since I bought my first press about ten years ago. Six years ago, I purchased an industrial heat press for my business and became spoiled by it's large 16x20 fusing area. You certainly don't need a press for fusing but it does make the job easier and faster.

Why block fuse? I think it's easier, faster and more accurate. No more fiddling with wiggly facing pieces and comparing them to the pattern to make sure they haven't been stretched or distorted. I also always hate cutting out the interfacing pieces, blech. Additionally, you don't have to worry about whether the interfacing shrunk during the fusing process.

To begin, I lay a Teflon sheet over my pressing surface. If my interfacing is a little larger than my fabric I don't have to worry about getting the glue on my silicone pad.


Next, I lay the fabric face down on the Teflon sheet making sure the fabric is on grain. The rectangular surface helps me line everything up. I then lay the interfacing glue side down onto the fabric and mist the interfacing lightly with water.


Lastly, I cover the interfacing with another Teflon sheet and close the press for 10 seconds. Once the fabric has cooled, I turn the fabric over and repeat this process.


Then, I am ready to cut!

Hmmm. Bubble skirt?

I've never been a big fan of the bubble, or pouf, skirt. Maybe it brings back memories of bad '80s fashion for me. But then, I saw this dress on The Sartorialist.


I never would have thought to make a jersey bubble skirt. I like it! I'm not sure if it will like me but I thought I'd give it a shot anyway. I bought this Simplicity pattern and pulled some rayon jersey out of my stash. I'll let you know how it goes!

Wednesday, June 14, 2006

Frogs!

Now, you probably think this post is about making lovely knotted frogs for use as closures. Not so! When I was watering the potted plant in my courtyard today, I noticed a few little specks of soil bouncing around the inner rim. When I looked closer, I realized that they weren't bits of soil at all - they were the teeniest little frogs I have ever seen! To give you an idea of how small they were, that white ball is a piece of Perlite. Teeny, teeny, tiny! Preemies, even! Okay, back to sewing.

Monday, June 12, 2006

UFO Central

If you dare tempt the Sewing Fates (as I did yesterday) by beginning a new project while piles of UFOs await completion you will be punished. You will make a big cutting error and the adorable Pucci-print dress you envisioned wearing all summer will never become a reality. Trust me. After said mistake, I had two choices 1) shut off the iron and take a nap or 2) get right back on the horse and finish one of those UFOs. I bravely chose option #2. I had known what this beautiful rayon/lycra knit from Textile Studios would become from the moment it arrived: a wrap top (Onion 5032) to wear with jeans. Why it took me so long to finish, I have no idea but here it is - finally. One to-do crossed off the list!


Maybe the Fates will feel that I have sufficiently redeemed myself and will allow some more of that brown Pucciesque rayon/lycra to appear.

Saturday, June 10, 2006

A New Treasure

I recently scored this lovely vintage Claire McCardell pattern on Ebay. I really like the style so I might actually make this one. I will carefully copy each piece as the paper is very delicate. For now, I've popped it directly into an acid free bag for safekeeping. It looks to be from the late '40s or early '50s.


While we're discussing Ebay, I'd like to piggyback onto Erin's Dress A Day web rant. I like to check Ebay often for new vintage patterns. Lately, this has become a very frustrating task. Maybe my patience is simply wearing thin, maybe not. Here goes:

*Get rid of all the extraneous graphics. All I want to see is a decent picture and a brief description along with your terms. I don't want to have to search for them. If there are too many graphics and your page takes too long to load even on my high-speed connection I'll be hitting the Back button.

*Please list the bust measurement in the title. Size means nothing when it comes to vintage patterns. "1950s evening gown B32" tells me everything I need to know - "1950s evening gown size 14" requires further investigation which I might, or might not, have time for.

*Please add a gallery photo - it's only $.35. There are many hundreds of new vintage patterns listed every day. Most of us skip right over the ones without a gallery photo.

*Erin said it and I'll say it again: spelling counts. I will bid to the death for a Claire McCardell pattern but if you misspell her name I'll never even see your auction.

*No music or sound of any kind. It can't be said often enough. There's nothing worse than having the life scared out of you when you're trolling for patterns in the wee hours. Sleeping husbands don't like it either. :-O

*Try to end your auction at a normal hour - sometime before midnight EST is good. I've been known to stay up until midnight to ensure winning a desirable pattern but 3:00 a.m. is a bit much, even for me.

Thursday, June 08, 2006

Pretty Blouses and Beautiful Fabric

Last week I ordered some beautiful white and ivory Sea Island cottons from Michael's Fabrics. The samples he sent me were so silky, so heavenly, that I could not resist. I figured I'd make myself some nice basic shirts. Until I saw this beautiful blouse at Basset Mode. Isn't it gorgeous? It's fresh and feminine and would pair equally well with a skirt or jeans. Then, I remembered my small stash of French laces and Swiss embroideries and knew that I could use them to make something similar. The sheer stripes will be replaced by laces and I will embellish the plain fabric with embroidery, pintucking and perhaps some puffing. Yet, because of the sophisticated chevron design I will not end up looking like a cupcake.

Sunday, June 04, 2006

Another New Dress - Final

I had the house to myself today so I was finally able to finish up this dress! First, here is a close-up of the button and loop detail I added at the center front. The buttons are vintage mother-of-pearl. I think they are going to want to face whichever direction suits them so I'll just have to deal with that. I originally wanted to use covered buttons (covered in the main fabric) but I couldn't find any small enough.


I decided to extend the front band around to the back on this version since I was using contrasting fabrics. I think it was worth the extra effort.


As you can see, I decided to use the main fabric for the hem band and use more uncorded piping to accent the seam. The more I thought about it, the more I thought I didn't need that horizontal cut at the hemline. I'm short enough as it is. :-)


Here's a closeup of the bodice. I'm a little annoyed with myself. I ended up having to let out the bodice 3/8" for extra length over the bust (different fabric, different fit) and didn't think about the fact that I'd need to add an extra button and loop. By the time I noticed my mistake it would have required many hours of reverse sewing to correct so I decided to leave it as it is. Hopefully, no one will notice.

Friday, June 02, 2006

Another New Dress - Part 2

As you can see, work on the dress hasn't come very far. I've had a busy work week with very little time to sew. I didn't make much progress on Memorial Day either! However, I am determined to finish it up this weekend as I'm feeling guilty about the many UFOs in my sewing room. Yet, I just keep starting new projects because that's more fun than trying to remember where I was on a project I stopped 6 months ago, sigh. Must. Get. Organized!

Anyway, I wanted to take advantage of the coordinating fabrics I chose for the project. Yet, I didn't want to give the dress too much of a bohemian look with lots of pattern blocking. Instead of using the contrast for the midriff inset I decided to use 1/8" uncorded piping in the seam instead. I think it's a very nice, subtle detail, don't you? I'm still on the fence about the hem bands. I have cut them out of the main fabric with the intention of simply piping the seam but now I'm wondering if I should use the contrast fabric instead? Decisions, decisions. I might have to try both before I make a commitment.


In this second photo you can just barely see the buttonloops I added at the center front. I have some lovely vintage pearl buttons that will be added shortly.

Thursday, June 01, 2006

I Love Ricky!

My sadness over losing the Desi Arnaz apron auction didn't last long! Last week, the same seller listed another copy and, you guessed it, tonight I am the lucky winner! Woohoo! Ricky and Lucy - together again.


A few people have asked me if I intend to make these patterns up. Hmmmm, not unless I can persuade my darling husband to barbeque in a shirt and tie. Me? Well, I don't cook much. I intend to frame copies of the envelopes and then tuck the patterns themselves into acid free bags for safekeeping.

Decorative Elastic Finish

Now that so many of you have coverstitch machines, I thought I'd rerun this tutorial from 2001. This is a very easy and neat (yes, I love my sewing to be neat and tidy!) way to finish a knit. I'd originally titled this the Picot Elastic Finish but there are so many types of decorative elastic available today that I felt it necessary to change the title. We normally think of this finish as being used in lingerie but it works equally well on the necklines and armholes of street clothes. Here I've used a ruffled elastic to finish the edges of the Loes Hinse Tank. Not only does it look nice it's also very quick and easy!


The first thing you'll want to do is check the seam allowances. They should be equal to the width of your elastic (not counting the decorative edge). If your elastic has a very wide decorative edge, you might consider trimming the neckline down. Otherwise, the finished opening will be a bit smaller - not really a problem on a deep neckline but it could be uncomfortable on a jewel neck or at the underarm.

Next, you'll need to sew up one shoulder seam - I usually sew up the right side first. Then you will serge the elastic to the edge right sides together. It isn't necessary to stretch the elastic. Instead, apply it in a 1:1 ratio. When you turn the elastic inside you will be turning a smaller circle (the cut edge) into a larger one (the body of the garment) so gaping will not be a problem.


Then, simply turn the elastic to the inside and coverstitch along the edge from the right side.
Lastly, you will sew up the remaining shoulder seam. I also like to tack the seam allowance down with a few straight stitches to keep it in place.


The finished product:


If you are finishing armholes on a sleeveless garment you will go ahead and do that now while the side seams are unsewn.