


Collar on Stand - Part 1
I published this tutorial on my GigiSews.com site a few years ago and thought that perhaps it was time to revisit the collar on stand. So many sewers seem to have trouble with this (especially the stand/band) but it's actually quite easy. I recommend you use 1/4" seam allowances in the collar, stand and neck edge of the garment. You can use 3/8" but I find 1/4" so easy to sew with a patchwork or 1/4" foot. The main thing is NOT to use 5/8" seam allowances. If you are new to shirtmaking, I really recommend that you try a Kwik-Sew pattern to start. Kwik-Sew always includes separate under- and upper-collar pieces so that you can educate yourself on the differences between the two. This will make it easier to modify patterns that only include one collar pattern piece later on. I will show you my super-easy cheater method next week!
Interfacing: I like to use fusible interfacing on both collar and stand pieces. My favorite interfacing is Palmer/Pletsch Sheer. It is lightweight yet crisp and bonds extremely well. If you are making a dress shirt and desire a very stiff collar you may want to use something like ShirTailor. I'm not fond of an overly stiff collar and prefer to use collar stays instead. This is a matter of personal preference.
Collar construction: Complete the collar. Go ahead and topstitch the edges and baste the neck edges together at 1/8" (you don't want to have to remove any visible stitching later).
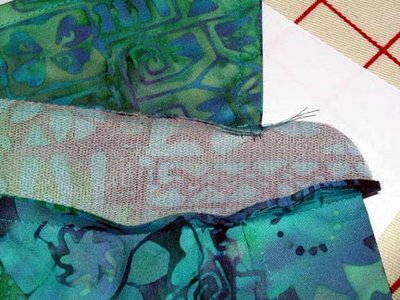
Step 1 The first step is to attach the inner band to the garment using (in this case) a 1/4" seam allowance.


Notice that I have stopped and started exactly at the shirt front edge - this is
imperative. Do not stop one stitch short or sew one stitch too many as this will be your pivot point when attaching the outer band. It is more important to stop exactly at the front edge than it is to have an exact 1/4" seam allowance.
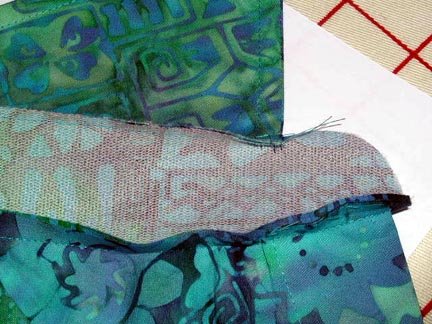
Step 2: Attach the completed collar to the inner band using an 1/8" seam. Again, you'll want to use the 1/8" seam to avoid having to remove any stitching later. Use a regular stitch length to hold the collar securely. Note that the upper collar will be against the inner band.
Tune in tomorrow for more!
Interfacing: I like to use fusible interfacing on both collar and stand pieces. My favorite interfacing is Palmer/Pletsch Sheer. It is lightweight yet crisp and bonds extremely well. If you are making a dress shirt and desire a very stiff collar you may want to use something like ShirTailor. I'm not fond of an overly stiff collar and prefer to use collar stays instead. This is a matter of personal preference.
Collar construction: Complete the collar. Go ahead and topstitch the edges and baste the neck edges together at 1/8" (you don't want to have to remove any visible stitching later).
Step 1 The first step is to attach the inner band to the garment using (in this case) a 1/4" seam allowance.


Notice that I have stopped and started exactly at the shirt front edge - this is
imperative. Do not stop one stitch short or sew one stitch too many as this will be your pivot point when attaching the outer band. It is more important to stop exactly at the front edge than it is to have an exact 1/4" seam allowance.
Step 2: Attach the completed collar to the inner band using an 1/8" seam. Again, you'll want to use the 1/8" seam to avoid having to remove any stitching later. Use a regular stitch length to hold the collar securely. Note that the upper collar will be against the inner band.
Tune in tomorrow for more!
posted by Gigi | 9:20 AM
![]()
2 Comments:
This comment has been removed by a blog administrator.
Thank you foor being you
Post a Comment
<< Home